Way back to China
Jing and I used to enjoy Japanese anime on BiliBili during lunch or dinner. However, due to political and commercial restrictions, many resources on Chinese platforms are inaccessible from overseas. Ironically, when we lived in China, we often used VPNs to bypass the GFW and access foreign platforms—now it’s the other way around.
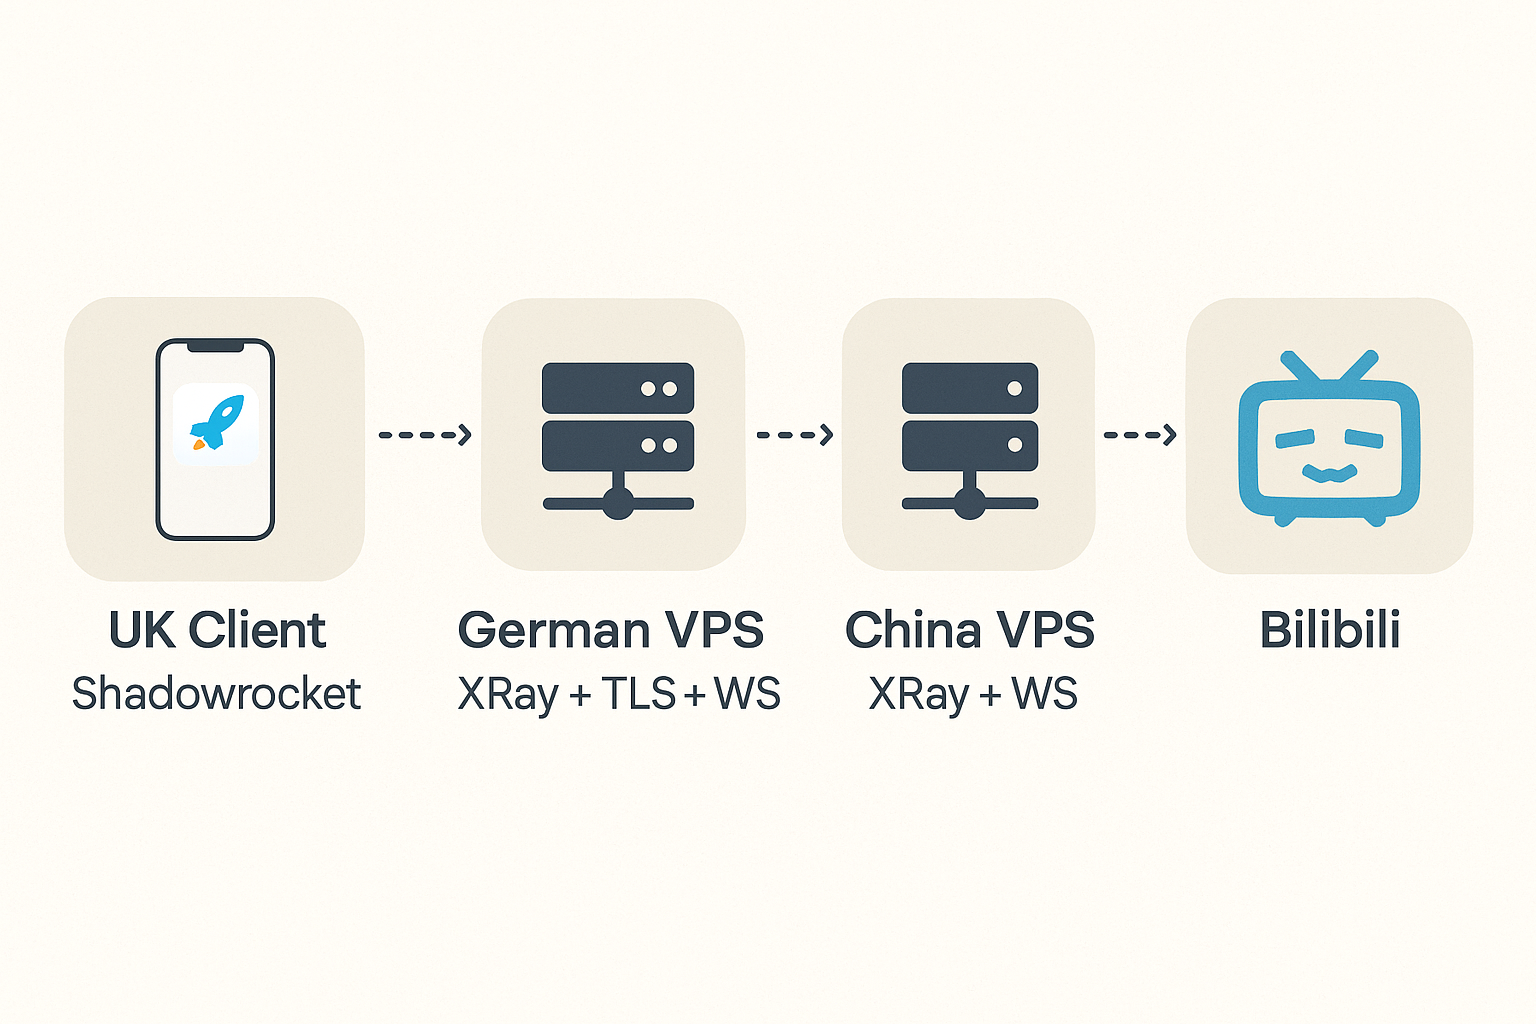
Fortunately, ChatGPT has once again proven to be a great companion for building small tools. With its help, I established a reliable connection that bridges the UK, Germany, and China—without writing a single line of code myself.
TL;DR
- 🇩🇪 Germany VPS: runs Xray with TLS, relays traffic to China
- 🇨🇳 China VPS: runs Xray, listens for WS+VLESS from Germany
- 🌐 Domain: points to Germany VPS via Cloudflare DNS
- 🔐 TLS Certificate: generated with acme.sh and DNS-01 verification
- 📡 Monitoring: a bash script detects connectivity and notifies via Telegram bot
Setup - Detailed Steps
Prepare VPS and Domain
To begin, I bought two VPS instances: one located in Germany (or any country with good international connectivity) and another in mainland China. The idea is to route traffic through the German VPS, which acts as a relay to the China VPS and ultimately reaches the target services.
At first, I assumed the German VPS might be unnecessary. However, I discovered that direct traffic from my UK PC to the China VPS was blocked, while requests relayed through the German VPS were accepted. This intermediate hop turned out to be crucial.
I purchased both servers on Alibaba Cloud during the 618 promotion, which offered significant discounts and excellent value.
A domain is required because I chose to use Xray with TLS encryption, which improves security. TLS requires a valid certificate issued for a specific domain—IP addresses alone won’t work. You don’t need to spend much; any affordable domain name is sufficient.
Once we have a domain, we need to configure a DNS record to point the domain to our entry point—the German VPS in my case. After that, all requests to the domain will be routed to that server. I recommend using Cloudflare for DNS—it’s fast, reliable, and free.
Why XRay + VLESS + TLS + WebSocket?
To build a secure and reliable bridge to access services in China, this setup uses XRay — a modern, modular proxy platform — along with a stack of transport layers designed to maximize compatibility and stealth.
Let’s break down the components:
VLESS — A Lightweight Transport Protocol
VLESS stands for “Vision Lightweight Extensible Secure System”. It’s a lightweight protocol designed specifically for proxy scenarios, acting as the communication layer between clients and servers.
Key features:
- Authentication Support: Each client has a unique ID (UUID) used to identify and authorize connections.
- Encryption Agnostic: VLESS doesn’t enforce built-in encryption, which allows it to rely on external layers like TLS for better security and flexibility.
- Efficient and Minimal: Designed for performance with low latency and minimal overhead.
- Extensible: Supports additional transport mechanisms like TCP, WebSocket, and HTTP/2.
In my case, VLESS defines how the UK client communicates with the Germany VPS, and again from the Germany VPS to the China VPS.
TLS — Encrypting the Traffic
TLS (Transport Layer Security) encrypts the traffic between the client and server, ensuring that:
- The connection is secure and cannot be eavesdropped.
- The traffic looks like standard HTTPS to external observers, reducing the chance of being blocked or throttled.
TLS is required in this setup to make the proxy traffic indistinguishable from normal encrypted web traffic.
WebSocket — Transport Over HTTP
WebSocket (WS) wraps the VLESS traffic inside standard HTTP upgrade requests, making it:
- Appear like regular web traffic in firewalls and DPI systems.
- Easy to route through ports like 443, which are typically open.
This helps bypass censorship and integrate with CDNs if needed.
Setup China VPS
Let’s configure the China VPS first, as its configurations will be used by the Germany VPS. Although I used x-ui for convenience, this guide will demonstrate how to configure the China VPS manually via XRay for better control and flexibility.
XRay can be installed via its official install script:
|
|
Here is a sample configuration for XRay (/usr/local/etc/xray/config.json):
|
|
Note:
- This configuration is minimal and only keeps the necessary inbound that accepts traffic relayed by the Germany VPS.
- The TLS layer is handled on the Germany side; therefore, the China VPS listens on plain WebSocket.
- The inbound port in the conoiguration should be allowed via the Firewall dashboard.
Once the configuration is ready, you can manage the Xray service via systemd, which handles service startup, restart, and logging.
|
|
Xray will read the config from /usr/local/etc/xray/config.json by default. If something goes wrong, always start by checking the log output — for example, certificate issues or incorrect JSON will prevent Xray from starting properly.
Setup Germany VPS
Issue a Valid Certificate
First, let’s generate a valid certificate in preparation for the TLS configuration of Xray. We will use acme.sh, a lightweight and easy-to-use ACME client. To install it:
|
|
Below is a script for issuing a certificate and restarting the Xray service:
|
|
Note that CF_Token is required to authorize acme.sh to manage DNS records via the Cloudflare API. You can create one in Cloudflare Dashboard → Profile → API Tokens → Generate Token → choose “Edit zone DNS” and select target domain.
It is suggested to run the script periodically to renew the certificate, which can be done via Linux cronjob:
|
|
Alternatively, acme.sh supports using Cloudflare’s Global API Key for authentication, by setting CF_Key and CF_Email. However, this is not recommended, as the Global API Key grants excessive permissions across all zones.
Setup XRay
Now that we’ve issued a valid TLS certificate, let’s configure Xray to enable secure and efficient proxying between the German and China VPS.
Here’s a sample configuration file /usr/local/etc/xray/config.json:
|
|
Let’s break it down:
- Log
Controls the logging level of Xray."warning"is a balanced choice, showing warnings and errors while suppressing debug info. - Inbounds
This is where our proxy client connects.port: The port Xray listens on — 443 is standard for TLS.protocol: vlessis a lightweight, secure protocol.id: A UUID that identifies the client. Generate viauuidgen.security: tls: Enables TLS encryption.certificates: Specifies the path to the TLS certificate and key.network: wsandwsSettings.path: The proxy runs over WebSocket and the path endpoint, which I set to/proxyfor both German and China VPS.
- Outbounds
Defines where traffic is forwarded.- In this case, it forwards to my China VPS over
vless+ws. addressandport: Set to my China VPS’s IP and listening port.users[].id: The UUID expected by the China VPS for authentication.- The WebSocket path should be the same as the one set in my inbound WebSocket path on my China VPS.
- In this case, it forwards to my China VPS over
Be sure that both inbounds and outbounds are correctly aligned in terms of protocol, path, and encryption — otherwise the handshake will fail.
After setting up the China VPS and Germany VPS, you can check if the connection is working properly. The easiest way to do this is to send a test request to the Germany VPS’s WebSocket endpoint. You can use curl to do this:
|
|
You should see a response from the server with a status code of 400 Bad Request, which indicates that the connection is working but the request is not valid for the XRay WebSocket protocol. This is expected since we are not sending a valid WebSocket handshake.
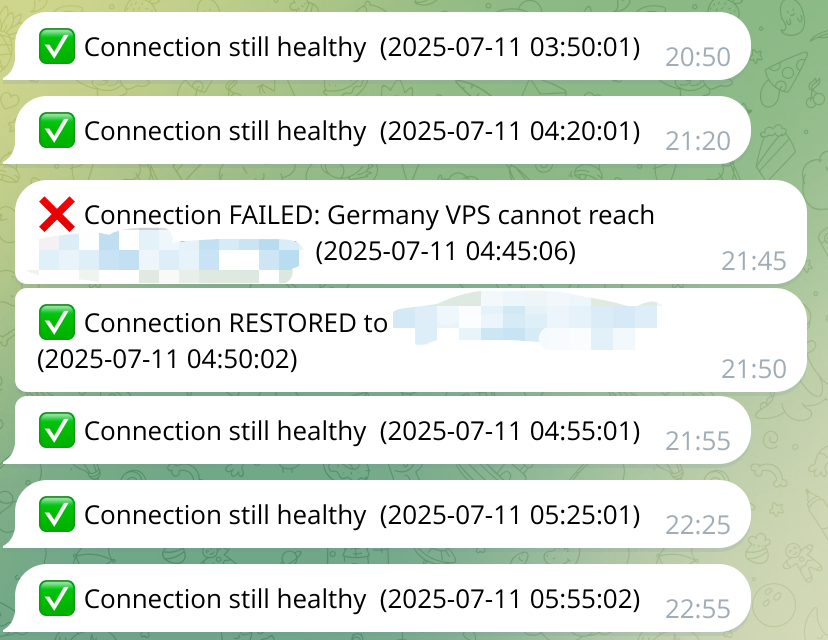
Monitor and Notification
The connection from German VPS to China VPS is crucial for the whole link. Thus I hope to monitor and report its connection status periodically. Here ChatGPT helped write a simple script for monitoring and report status via Telegram Bot.
|
|
The check script can also be setup as a cronjob:
|
|
In this way, we can receive real-time notifications about the connection status — whether it’s healthy, down, or has just recovered.
Check Connection
Now that all the configurations are set up properly, you can configure your local machine to use the Germany VPS as a proxy. This can be done by setting up your browser or system proxy settings to point to the Germany VPS’s IP address and port. For example, if are a iPhone user, you can use Shadowrocket to configure the proxy settings.
Via whatismyipaddress.com, you can check if your IP address is the one of your China VPS. If it is, congratulations! You have successfully set up a reliable connection from the UK to China and its time to enjoy your favorite Chinese content.